

Écrit parMo Kahnle


Vous avez un portrait qui nécessite un effet de flamme contrôlée, ou une photo de produit qui semble trop propre, alors vous tapez « mettre le feu » dans une application d'image IA. Le troisième rendu arrive avec une tache orange plate, une flamme semblable à une torche détachée, ou une lumière qui ne touche pas du tout le sujet. Le problème ne vient généralement pas du générateur. C'est que« mettre le feu » décrit un résultat, et non un brief visuel.
Une combustion convaincante nécessite des décisions concernant le comportement des flammes, l'intensité, la couleur, la direction de la lumière, l'atmosphère et le cadrage de sécurité. L'expression elle-même a également deux sens. « To set on fire » signifie causer délibérément la combustion de quelque chose, tandis qu'au sens figuré, cela peut signifier dynamiser ou rendre quelque chose extrêmement réussi, comme le montrel'explication du « set on fire » par le Cambridge Dictionary. Dans un prompt d'image, cette ambiguïté a son importance. Vous ne demandez pas un mot. Vous mettez en scène une scène.
Un créateur avec un portrait ne veut généralement pas d'une personne couverte de flammes. Il veutune lumière en forme de flamme sous le menton, un reflet chaud dans les yeux, quelques langues de feu contrôlées traçant le bord des cheveux, et peut-être de la fumée se dissolvant dans un fond sombre. C'est un portrait éclairé par le feu, et non une représentation littérale de quelqu'un qui brûle.
Un produit phare a un brief différent. Une basket sur un socle noir peut avoir besoin d'un anneau de feu propre autour de sa base, d'une lueur chaude sous la semelle et d'une silhouette nette qui montre toujours la construction du produit. Une illustration fantastique peut nécessiter un personnage avec des flammes brûlant autour des bords de la cape, où le feu fonctionne comme une bordure graphique plutôt que comme un danger réaliste.
Avant d'ouvrir starryai, décidez ce que fait le feu :
Le verbe contrôle l'action visuelle.« Traçant » et « léchant » suggèrent un mouvement localisé. « Englouti » et « flamboyant » suggèrent une couverture large.Si vous tapez seulement « portrait en feu », le modèle doit inventer l'ambiance, l'échelle de la flamme et la relation entre la chaleur et la peau.
Le feu peut communiquer la mélancolie, l'intimité, le danger, la célébration ou le spectacle. « Faible contraste, braise unique, fond sombre » crée de la retenue. « Flammes rugissantes, fort contraste, étincelles volantes » pousse vers l'action. Si l'effet recherché est principalement l'éclairage, unguide de rééclairage pour les créateursdédié peut aider à clarifier la différence entre modifier l'éclairage et ajouter un élément brûlant littéral.
L'expression littérale a également un poids précis dans le monde réel. Le FBI a signalé33 289 incendies criminels en 2024, contre41 171 signalés en 2017, tandis que le taux d'incendies criminels signalé était de13,3 pour 100 000 habitants en 2017, 10,9 en 2019, et20,2 en 2024. Ces chiffres proviennent de l'historique étymologique et statistique recueilli parl'article de l'étymologiste sur « incendiaire ». Pour le travail visuel, cette distinction est utile : si votre intention créative est l'ambiance, dites ambiance. Si vous voulez dire ignition délibérée, votre langage devient beaucoup plus littéral.
Le flux de travail le plus propre commence par la composition, pas par la flamme. Dans starryai, entrez dans le flux Créer, choisissez un modèle d'image et décidez si vous commencez avec du texte seul ou avec une image de base. La génération de texte seul fonctionne bien lorsque vous voulez que le modèle invente toute la scène. Le téléchargement d'une image de base fonctionne mieux lorsque la pose, l'angle du produit ou le cadrage ont déjà de l'importance.
Une séquence pratique ressemble à ceci :
Le flux de travail d'édition est important car il séparela stabilité du sujet de l'expérimentation de la flamme. Vous pouvez préserver le visage, la géométrie du produit ou la pose du personnage tout en changeant « lueur de braise unique » en « anneau de flamme dynamique ». Leguide de démarrage rapide de starryaiest utile pour vous orienter vers le flux de création plus large, en particulier si l'interface a changé depuis votre dernière session.
Règle pratique :Établissez d'abord la composition, puis utilisez Modifier pour placer le feu. Ne demandez pas à une seule invite de résoudre la pose, l'angle de la caméra, l'identité du sujet, le comportement de la flamme et l'atmosphère en même temps.
Gardez le premier rendu délibérément simple. Une image de base avec un éclairage clair et une silhouette définie donne à la flamme plus d'informations à suivre. Si la première tentative est proche mais que la brûlure est mal placée, changez le masque avant de réécrire toute l'invite.
Une invite de flamme fiable comporte cinq parties mobiles :
L'ancre du sujet indique au modèle ce qui doit rester reconnaissable. La phrase de comportement lui indique où le feu se déplace et quelle part du cadre il occupe. L'éclairage explique la conséquence physique, tandis que la palette et l'ambiance établissent la finition.
Try:
femme en clair-obscur, léchant des flammes traçant la ligne de sa mâchoire, lumière principale orange chaude, particules de cendre, tension cinématographique
La première phrase ancre le portrait. « Léchant des flammes » indique des langues étroites et actives plutôt qu'une couche orange unie. « Traçant la ligne de sa mâchoire » donne au feu un chemin à suivre. La lumière principale chaude indique au modèle d'illuminer le visage, et les particules de cendre ajoutent de l'atmosphère sans nécessiter d'embrasement total.
Vous pouvez affiner la scène avec des ajouts contrôlés :
Évitez d'empiler tous les adjectifs de feu que vous connaissez. « Explosif, rugissant, massif, flamboyant, infernal, englouti » donne au modèle des signaux d'échelle contradictoires. Un seul verbe d'action précis fait généralement plus de travail qu'une longue chaîne d'adjectifs. Leguide starryai pour rédiger des invites IApeut aider avec la discipline plus large consistant à ordonner le sujet, l'action, l'environnement et le style.
Pour une sneaker, utilisez un ancrage différent et une action de feu plus contrôlée :
basket sur socle noir, anneau de flammes contrôlé à la base, lueur sous-jacente jaune sodium, étincelles de braise, photo de produit éditoriale
Ici, « l'anneau de flammes contrôlé » maintient le produit visible. « À la base » empêche le feu de grimper sur la tige. « La lueur sous-jacente jaune sodium » décrit la lumière tombant sur le socle et la semelle, tandis que « la photo de produit éditoriale » protège la composition commerciale.
La même anatomie produit une image complètement différente car les verbes et le placement changent.« Traçant » crée du contour. « Anneau » crée du confinement. « Englouti » crée de la couverture. « Flamboyant » élève l'énergie mais ne spécifie pas l'emplacement.
Si le feu semble collé, ajoutez les conséquences plutôt que de répéter « feu réaliste ». Essayez « lumière de rebond orange sur les surfaces proches », « bord de flamme doux », « fumée ancrée à la base » et « lueur réfléchie sur le socle noir ». Ces instructions donnent au modèle des relations physiques qu'il peut rendre.
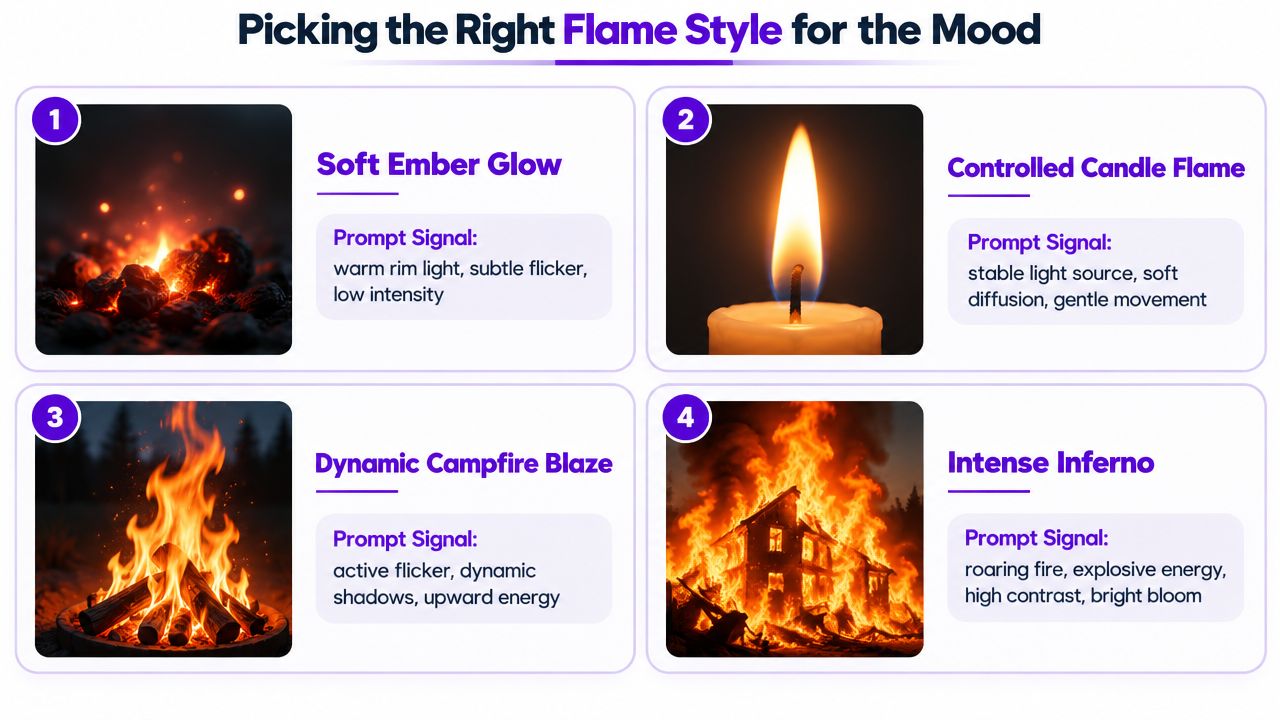
L'intensité du feu doit correspondre au travail émotionnel de l'image. Une braise contenue peut porter la mélancolie mieux qu'un mur de feu, tandis qu'une affiche fantastique peut avoir besoin de formes graphiques au lieu de fumée photoréaliste.
Utilisez :
lumière de contour chaude, braise unique, bord incandescent, fond sombre
C'est le bon choix lorsque le sujet doit sembler touché par la chaleur sans montrer de flammes évidentes. Il convient à un portrait pensif, un objet patiné ou une image de couverture où l'espace négatif compte. L'expression « bord incandescent » implique une combustion lente, tandis que « braise unique » maintient l'événement visuel petit.
Try:
petite flamme léchante, bougie unique, faible contraste, gros plan intime
Le langage de la bougie produit une source localisée et lisible. Il fonctionne pour les natures mortes, les scènes romantiques, les compositions de table et les photos de produits qui ont besoin de chaleur sans destruction. « Faible contraste » et « gros plan intime » empêchent la flamme de devenir une explosion théâtrale.
Pour un traitement fantastique cinématographique, utilisez :
flammes towering, léchages dynamiques, contraste élevé, brume de chaleur volumétrique, éclairage de contour dramatique
Cette invite crée un événement beaucoup plus grand. Le sujet a besoin d'une silhouette claire et de suffisamment d'espace environnant pour que le feu monte. Ajoutez un indice de style non réaliste, tel que « art conceptuel de film fantastique » ou « illustration cinématographique stylisée », lorsque vous voulez du spectacle sans cadre de dommage photoréaliste.
Utilisez :
flamme picturale, contours graphiques, ombrage cell, style bande dessinée
Cette approche remplace le réalisme physique par le design visuel. Elle est utile pour l'art des personnages, les affiches, les concepts de jeux et les graphiques sociaux où la forme et la couleur de la flamme sont plus importantes que le comportement naturel de la fumée.
| Cible de la flamme | Ambiance utile | Signaux d'invite |
|---|---|---|
| Lueur de braise douce | Mélancolie ou retenue | « bord incandescent », « braise unique », « faible intensité » |
| Scintillement de bougie | Romance ou intimité | « bougie unique », « diffusion douce », « gros plan » |
| Embrasement total | Action ou spectacle | « flammes towering », « contraste élevé », « brume de chaleur » |
| Brûlure illustrée | Drame graphique | « pictural », « ombrage cell », « style bande dessinée » |
Choisissez une intensité avant de rendre. Mélanger un langage à l'échelle d'une bougie avec un langage à l'échelle d'un inferno produit souvent un terrain d'entente confus, une flamme qui n'est ni délicate ni dramatique.
Une flamme plate a un modèle d'échec reconnaissable. Elle se termine par une découpe nette, ne projette aucune lumière, produit de la fumée sans direction et se pose sur le sujet au lieu d'occuper le même espace. Le langage de composition résout ces problèmes en décrivant l'interaction entre les éléments.
Ajoutez :
halo lumineux, bord de flamme doux, chute de gradient
Un halo lumineux suggère une chaleur concentrée. Un bord doux empêche la flamme de ressembler à un autocollant. La chute de gradient indique au modèle que l'éclairage s'affaiblit loin de la source. Sur le tissu, demandez « de la lumière chaude qui saigne dans les plis ». Sur la peau, essayez « de la lumière de rebond orange sur la joue et le cou ». Sur le métal, utilisez « de petits reflets de flamme réfléchis ».
La température de couleur crée de la profondeur. Associezombres ambiantes froidesaveccœurs de flammes rouge-orangelorsque vous voulez un look cinématographique ancré. Un fond bleu-noir contrastant avec un feu orange vif sépare le sujet et aide la flamme à être perçue comme une source lumineuse plutôt que comme une forme peinte. Une flamme monochrome et un sujet monochrome peuvent fonctionner, mais cette combinaison pousse intentionnellement l'image vers la stylisation.
La fumée a besoin d'une trajectoire. Utilisez :
fumée directionnelle s'étirant vers le haut et la gauche, de de fines mèches à la base de la flamme
L'expression directionnelle implique le vent ou le flux d'air. Des « fines mèches » permettent de garder la base lisible au lieu d'ensevelir le sujet dans un nuage gris. Si la scène doit sembler calme, remplacez le mouvement directionnel par « des colonnes de fumée verticales et délicates ». Si elle doit sembler turbulente, demandez « des traînées de fumée brisées s'éloignant en tourbillonnant de la flamme ».
La distorsion thermique offre un autre indice physique :
scintillement volumétrique, brume de chaleur au-dessus de la flamme, reflets rehaussés sur les surfaces les plus proches
Ces indices fonctionnent mieux lorsqu'ils sont utilisés avec parcimonie. Trop de brume peut adoucir les bords du produit ou déformer les traits du visage. L'outil Édition est particulièrement utile ici. Superposez une invite de flamme sur un rendu de base stable, peignez (inpaint) uniquement la zone du feu et gardez la pose du sujet inchangée entre les itérations. Modifiez l'intensité de la flamme, la densité de la fumée ou la palette, mais ne modifiez pas la composition sous-jacente en même temps.
Un effet de feu semble intégré lorsqu'il modifie la lumière qui l'environne, et pas seulement les pixels à l'intérieur de la flamme.
Pour les campagnes nécessitant un traitement animé par la suite, les mêmes principes se transfèrent au motion design. Une équipe comparant dessociétés de motion designdevrait demander si le traitement final peut préserver la direction de la flamme, l'atténuation de la lueur, la continuité de la fumée et la lisibilité du sujet d'une image à l'autre. Une image fixe convaincante est construite à partir de la même logique visuelle qu'une séquence convaincante.
L'hypothèse selon laquelle une application d'image IA rendra n'importe quelle phrase littérale sur le feu est fausse. Les invites représentant une personne réelle ou photoréaliste en train de brûler peuvent être refusées ou floutées, et un libellé direct tel que « personne en feu », « humain englouti » ou « victime de brûlure » est susceptible de déclencher un filtre de sécurité.
Cela ne signifie pas que vous devez abandonner l'idée créative. Cela signifie que vous devez présenter le sujet comme une représentation artistiquement dirigée plutôt que comme la description d'un préjudice réel.
Utilisez l'une de ces ancres :
Ajoutez ensuite un indice de style tel que « pictural », « illustration graphique », « rendu 3D » ou « image fixe cinématographique d'un film fantastique ». Ces termes précisent que l'image appartient à un monde visuel imaginaire.
Le feu dans un élément d'arrière-plan est différent du feu consumant un visage humain photoréaliste. Des flammes sur un objet, une illustration stylisée ou un éclairage de contour sur un portrait posé communiquent généralement l'effet visuel sans représenter une personne réelle en train de subir un préjudice actif. Un test de figure de cire est un filtre éditorial utile :
Si l'invite fonctionne toujours lorsque vous la remplacez par « figure de cire », la direction artistique est probablement suffisamment spécifique pour rester représentative.
Ce n'est pas une garantie, et les filtres peuvent réagir à l'ensemble de l'invite plutôt qu'à une seule phrase. Consultez lapolitique de contenu de starryaiavant de tester un cas limite, en particulier lorsqu'une ressemblance humaine réaliste, des blessures ou une scène destructrice sont impliquées.
Une réécriture pratique pourrait changer « femme en feu » en :
portrait peint et stylisé d'une figure de cire, entouré d'élégantes flammes orange, lumière de contour chaude, fond de galerie sombre, art fantastique cinématographique
Le résultat peut toujours transmettre la chaleur, la lueur et le drame. Il supprime l'implication qu'une vraie personne est blessée.
Utilisez ce bref mémo avant chaque rendu :
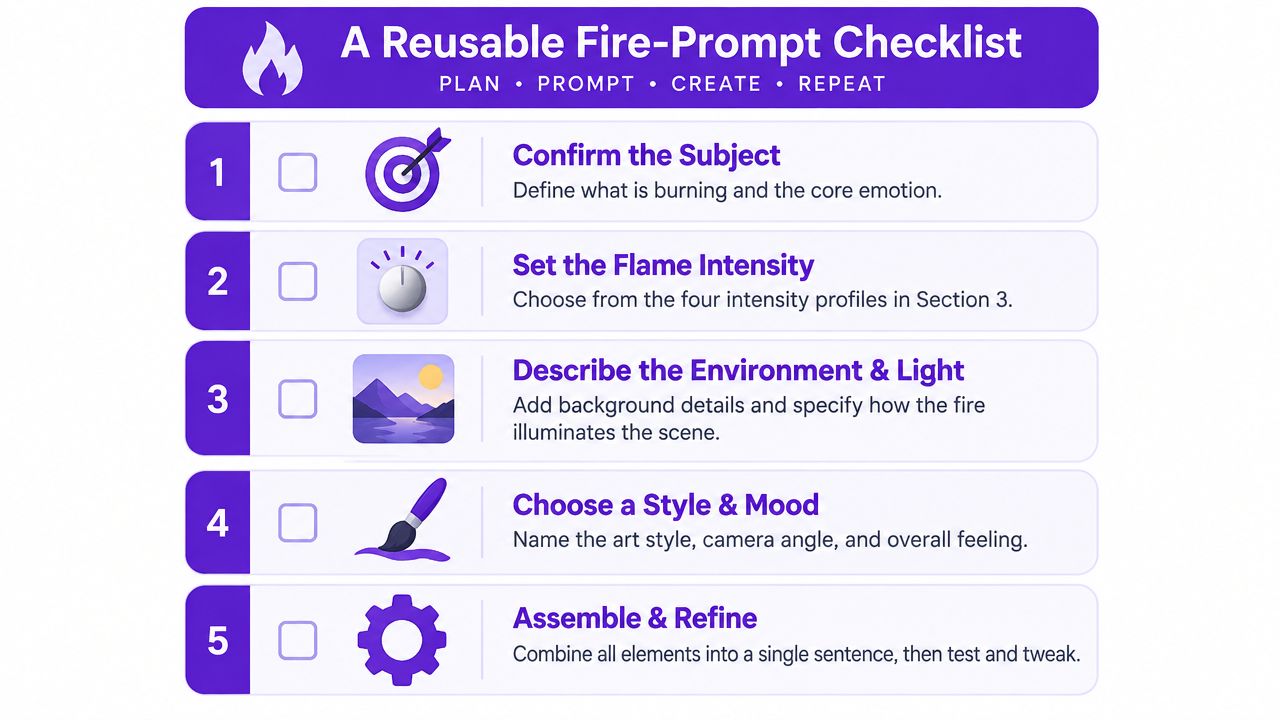
Un modèle réutilisable pourrait se lire ainsi :
[sujet et pose], [comportement et direction des flammes], [palette], [lumière sur les surfaces environnantes], [fumée et atmosphère], [style], [humeur]
Pour un portrait sécurisé :
portrait de type figure de cire posant, petites flammes léchant la silhouette extérieure, palette chaude orange-ambre avec des ombres bleues fraîches, douce lumière de contour sur le visage, fine fumée s'élevant derrière, style fantastique cinématographique et pictural, ambiance dramatique contrôlée
Pour un produit :
baskets sur socle noir, cercle de flammes contrôlé s'élevant à la base, feu orange-ambre avec un centre blanc incandescent, lueur sous la semelle et la plateforme de type jaune sodium, étincelles de braises éparses, style photographie de produit éditorial, ambiance premium énergique
Exécutez deux ou trois itérations en modifiant une seule variable à la fois. Si le feu est trop faible, augmentez sa description comportementale. S'il submerge le sujet, réduisez la couverture et renforcez plutôt l'indice d'éclairage.
starryai vous permet de créer et d'éditer des visuels à partir de descriptions textuelles, d'images téléchargées et de croquis, ce the rendant idéal pour tester des traitements de flammes contrôlés sans avoir à reconstruire toute la composition à chaque fois. Visitezstarryaipour commencer avec un portrait, une image de produit ou un concept de personnage, puis utilisez l'outil Éditer pour affiner le placement, l'intensité, la palette et l'atmosphère des flammes.


.svg)