Written by Mo Kahn on
March 28, 2025


Using starryai, an ai generator app, is easy... at least, it will be once you’re done with this guide.
Our goal with starryai has always been to make AI art process as easy as possible for creators. Thus, our hope is once you get acquainted with the workflow of the ai art generating app, it becomes a seamless, stress-free journey for you to render beautiful creations.
In this tutorial we will explore starryai and its AI, Argo, to help you get acquainted in no time.
By the end of this guide you will be able to:
When you open starryai, you will see an array of options to choose from. Do not feel overwhelmed, we will walkthrough every feature and interaction. Once we're done, you’ll become a master of the app.
Firstly, you want to set up your profile. Tap on the Explore tab at the bottom right, then tap on the profile icon at the top right of the app window. Hit the edit button to start customizing your profile page.
On edit page you’re able to:
On your profile page, you’re able to view how many creators follow you, how many you follow and how many likes your published artworks have garnered.
The homepage allows you to get right into using AI to make art.
The first thing you’ll see is the Create section with “Enter a prompt” text book. This option gets you to start creating right away. We will be diving into the creation process in more detail later on in this guide. For now, simply tap onto the text box to start creating your art.
Next, you’ll see the Projects section. This is a carousel of all your recent projects you’ve started on in the Workspace area. Don’t worry, we will be exploring Workspace in-depth to get you acquainted with the feature in no time.
The third section is dedicated to the Recent section. This is the area where all your recent renders from Workspace and My Collections will show up, making it easy to navigate through your wonderful creations.
At starryai, we are always hosting fun events to keep the spirit of the community alive. In this section you’ll be kept informed of all the events happening in our Discord community, the starryai way.
The discover section is a place to find and connect with the most budding creators of the starryai community. Tap on a creation to learn more about it and give it some love.
The Explore tab is a space where you can discover creators on the starryai community. It is also where your creations show up for the community once you publish them. We will be covering how to share your creations later on. For now, we will be overviewing the different ways you can navigate the Explore tab.
The goal of the Explore feed is to instil a sense of community by encouraging our creators to interact with fellow artists. On starryai you can follow other creators, as well as, like their artworks to show appreciation.
The Explore feed is filtered through several ways:
The other way to filter is by tapping on Following. This will only show you artworks shared by creators you follow.
starryai uses credit system to allow its users to create artwork on the app. You get 5 daily credits to use your creations. There are several ways to ensure you have enough credits to keep making beautiful artwork:
If you’re looking for free ways to keep using the app then you’d want to earn the credits. Here are the ways to earn credits:
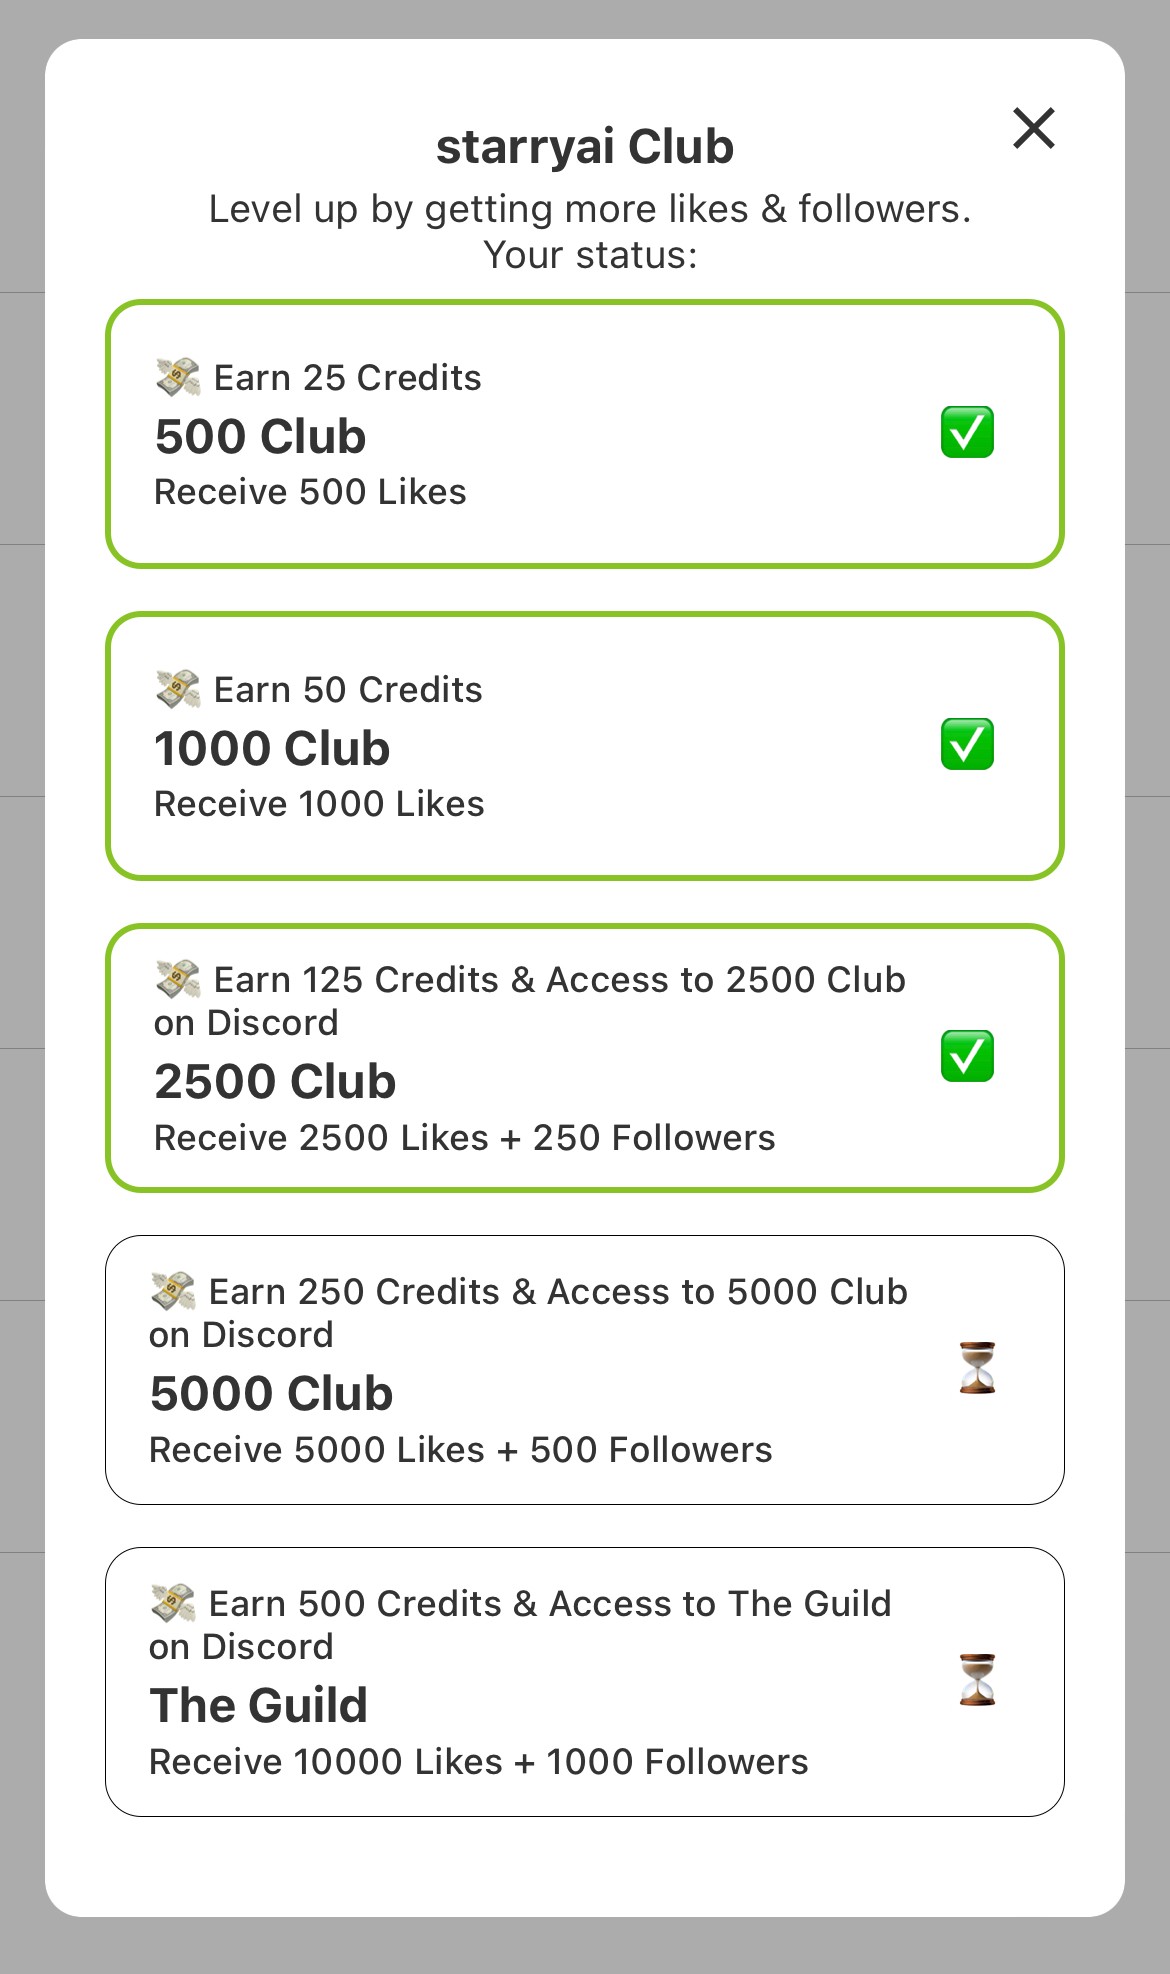
The more traction your artworks gain on the starryai community, the more credits you earn. We have various clubs that users are invited to based on where they are on their starryai journey. To learn more, simply tap on the Earn button then tap on starryai Club to see the various tiers and the requirements to join. Please note, it can take up to 24-48 hours for the club badge to show up on your profile along with the credit reward. You also get to join the exclusive Club channel on our Discord community, the starryai way!
Hack: The best way to earn likes and followers to climb up the Clubs ladder, we suggest sharing your creation links on your social channels, as well as, the Discord community, the starryai. The more links you share, the more visibility your works will get and the more visibility your work gets, the more likely you’ll gather the likes and followers you need to earn that status!
We believe that sharing artwork is the best way to spread some goodness in this world. So to reward this noble action, we gift our creators with credits each time they share their artwork on their social channels.
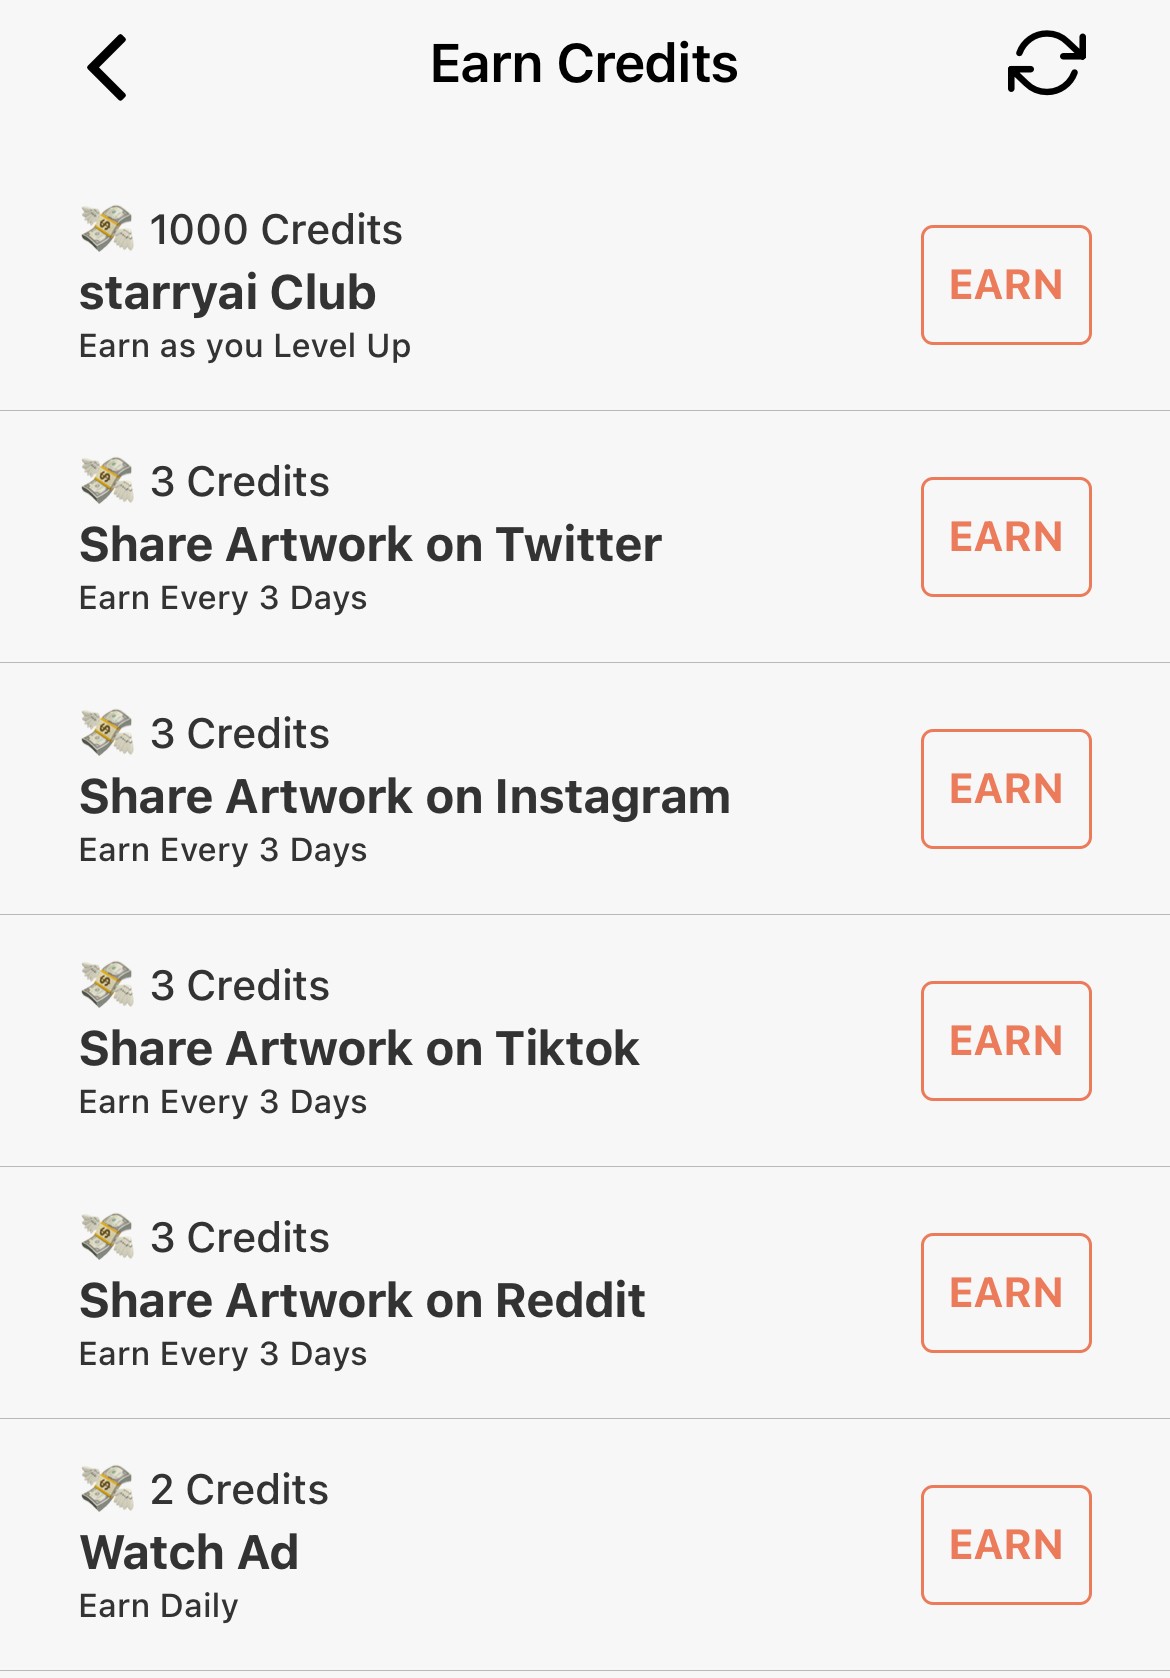
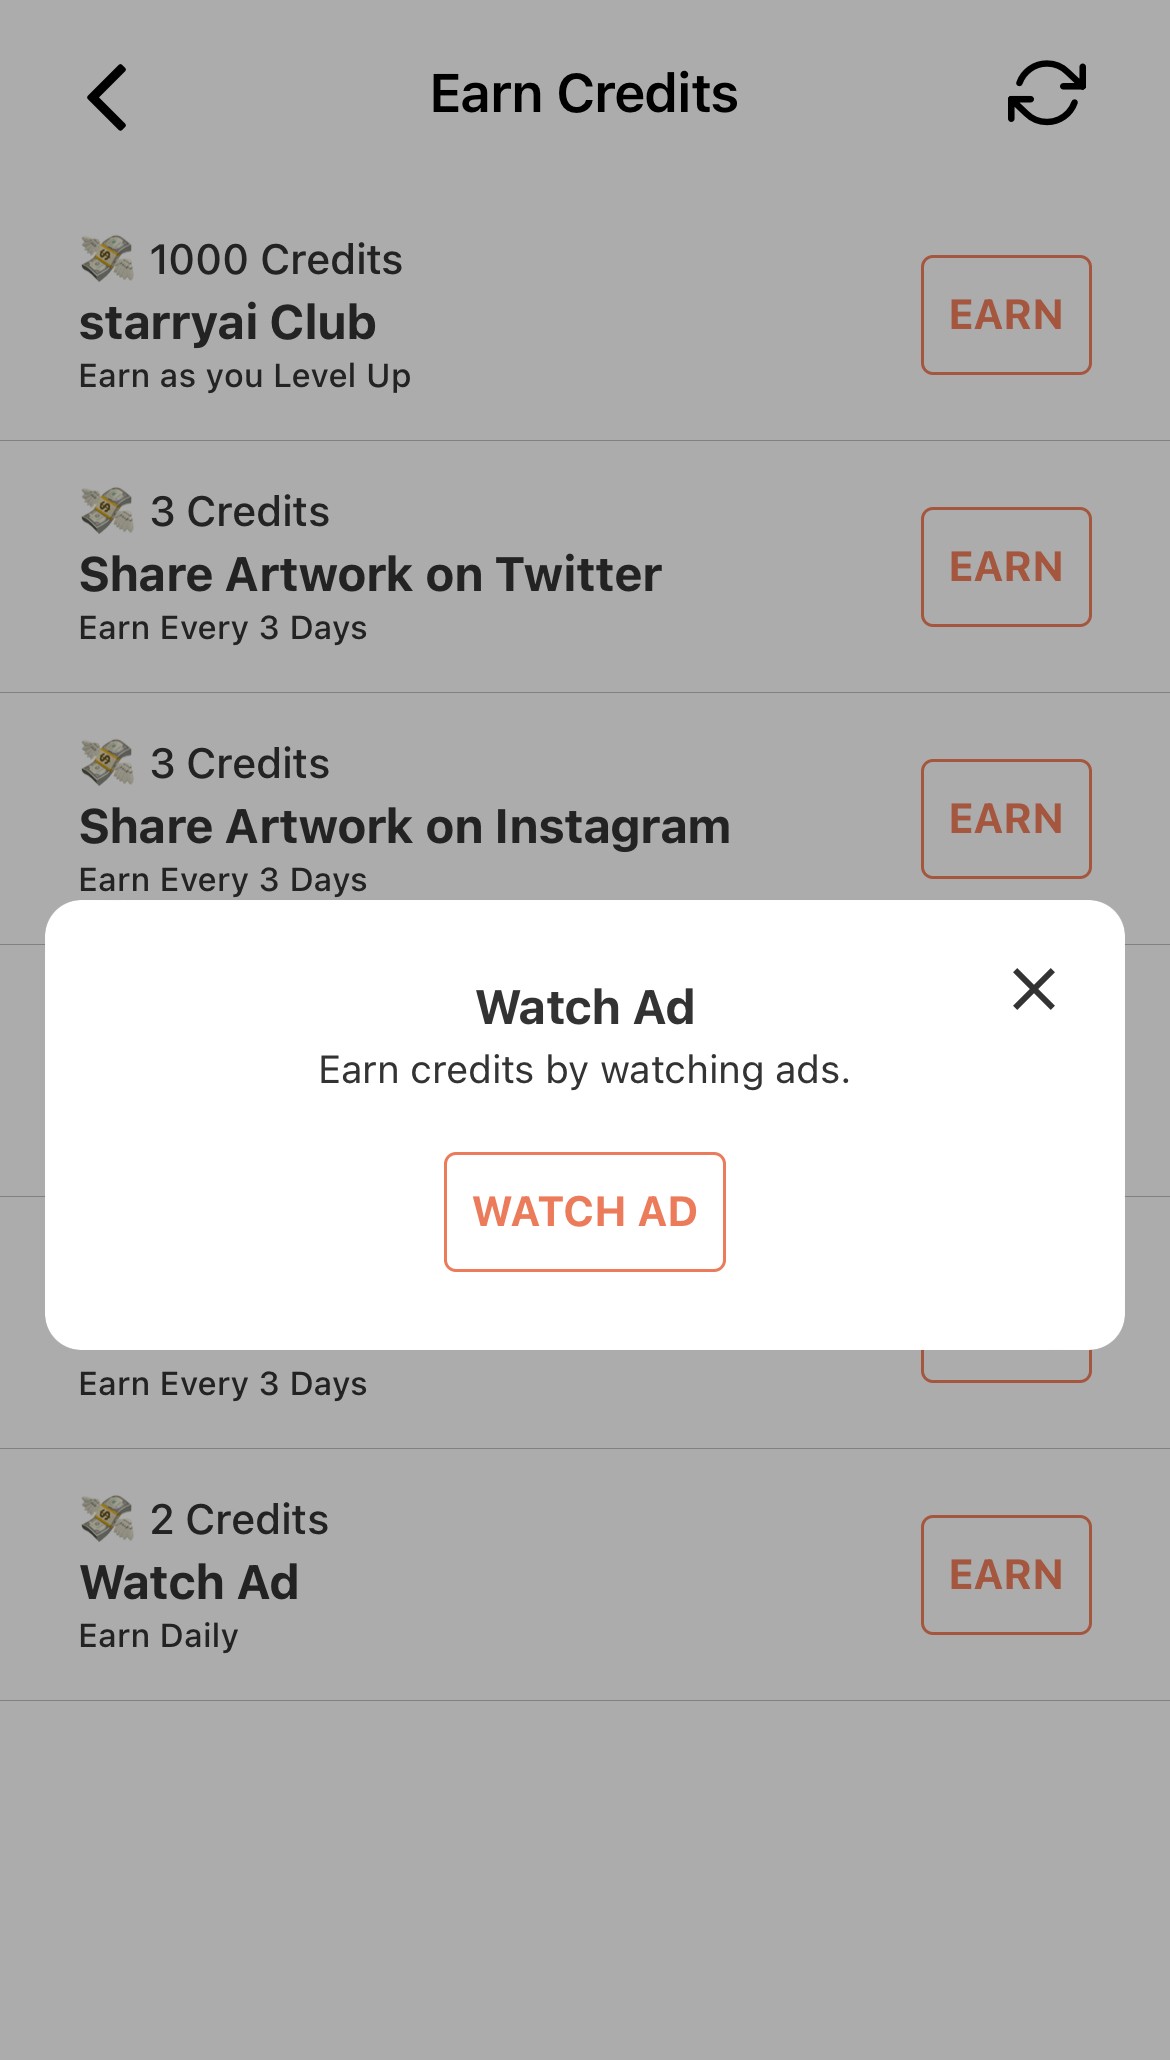
You can also watch ads as a way to earn some credits. Simply tap on Watch Ad and you should be on your way to bagging some more credits to create amazing art with.
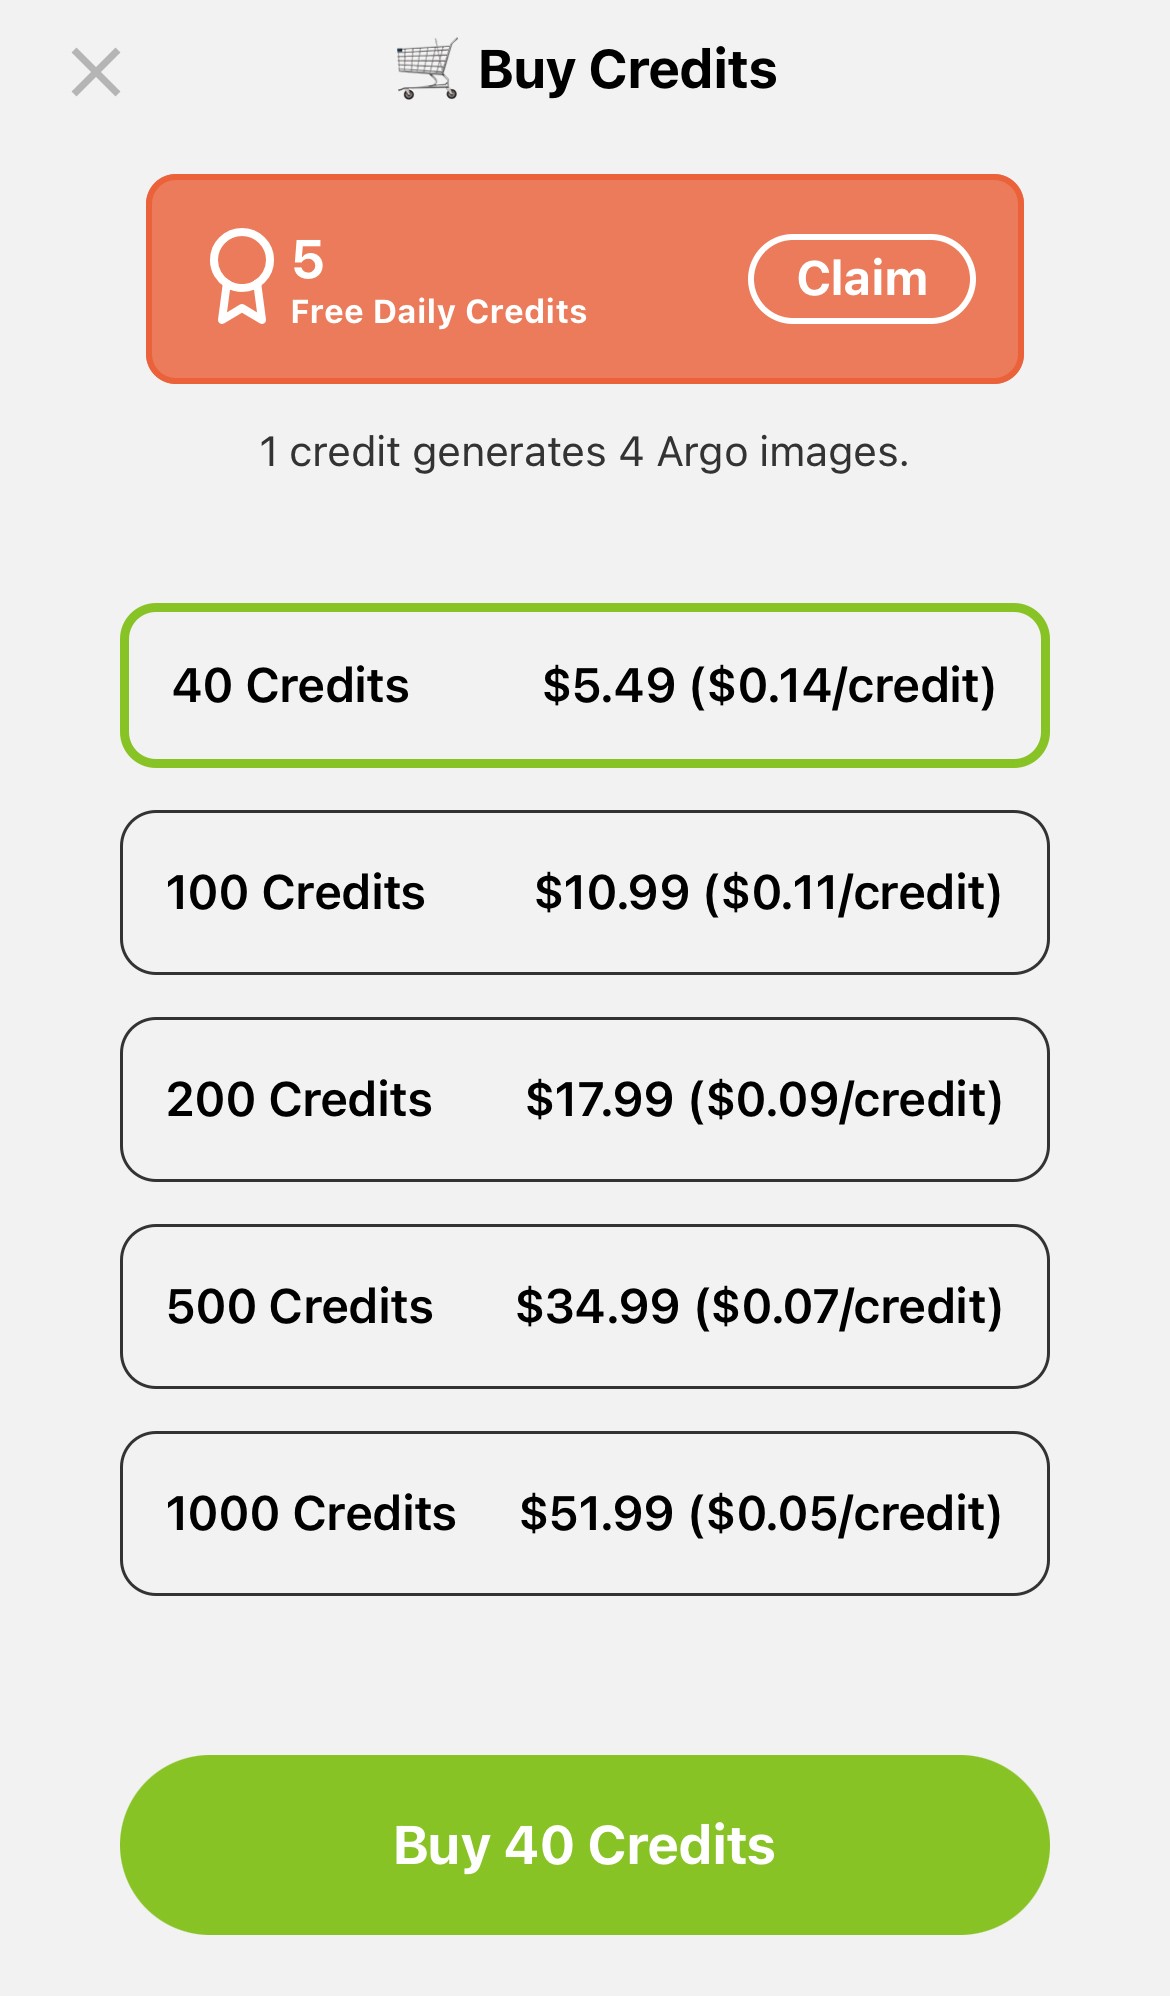
The easiest way to keep your starryai wallet full is to buy credits. There are different packages based on the budget. Simply tap on the Buy button at the top to see the options.
Pro Membership allows creators to access additional features and canvas sizes. You have the option of purchasing a monthly Pro membership or opt-in for an annual membership.
If you have any questions or want to get more info, we have a FAQ page to answer any questions you may have.
Now on to the fun part!
Creating artwork on starryai is as easy as pie- maybe easier!
Before we dive into the how of it, let’s first overview some spaces that you may have to familiarize yourself with to better navigate the app.
If you tend to create a ton of creations that are based on specific themes or prompts, Workspace is where you’d wanna house them. In Workspace, you can organize your creations per Project. You can have as many Projects as you’d like within the Workspace and as many creations as you'd like within each Project.
To create a Project in Workspace, tap on the +New button on the top right corner of the app. Name your project; this is only for your eyes so feel free to name it whatever you like. Once you’re in the Project, you are now ready to create your creations. We will be diving more into that later.
Once you’re done creating your work, you can select images you like and transfer them over to My Collection. From there you’re free to Upscale, as well as, Publish on your profile.
The other place to house your creations is under My Collections. This is more of a playground where you don’t have to worry about organizing your artwork but rather create them every time the inspiration strikes. Creations in My Collections are ready to go as soon as they’re rendered. Meaning you can upscale, publish and download your images right away.
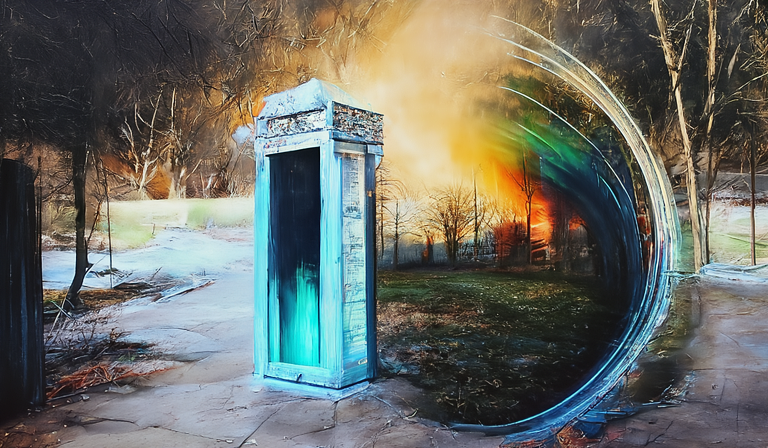
Argo is based on the Stable Diffusion model that truly expands the horizon of what AI can create. It is extremely versatile and allows artists to push the boundaries of their creativity. Argo is perfect for Product ideation, artistic composition and realistic renders. If you can imagine it, it is possible- with Argo.
To stay true to the simplicity of the app, Argo has a very standard workflow.
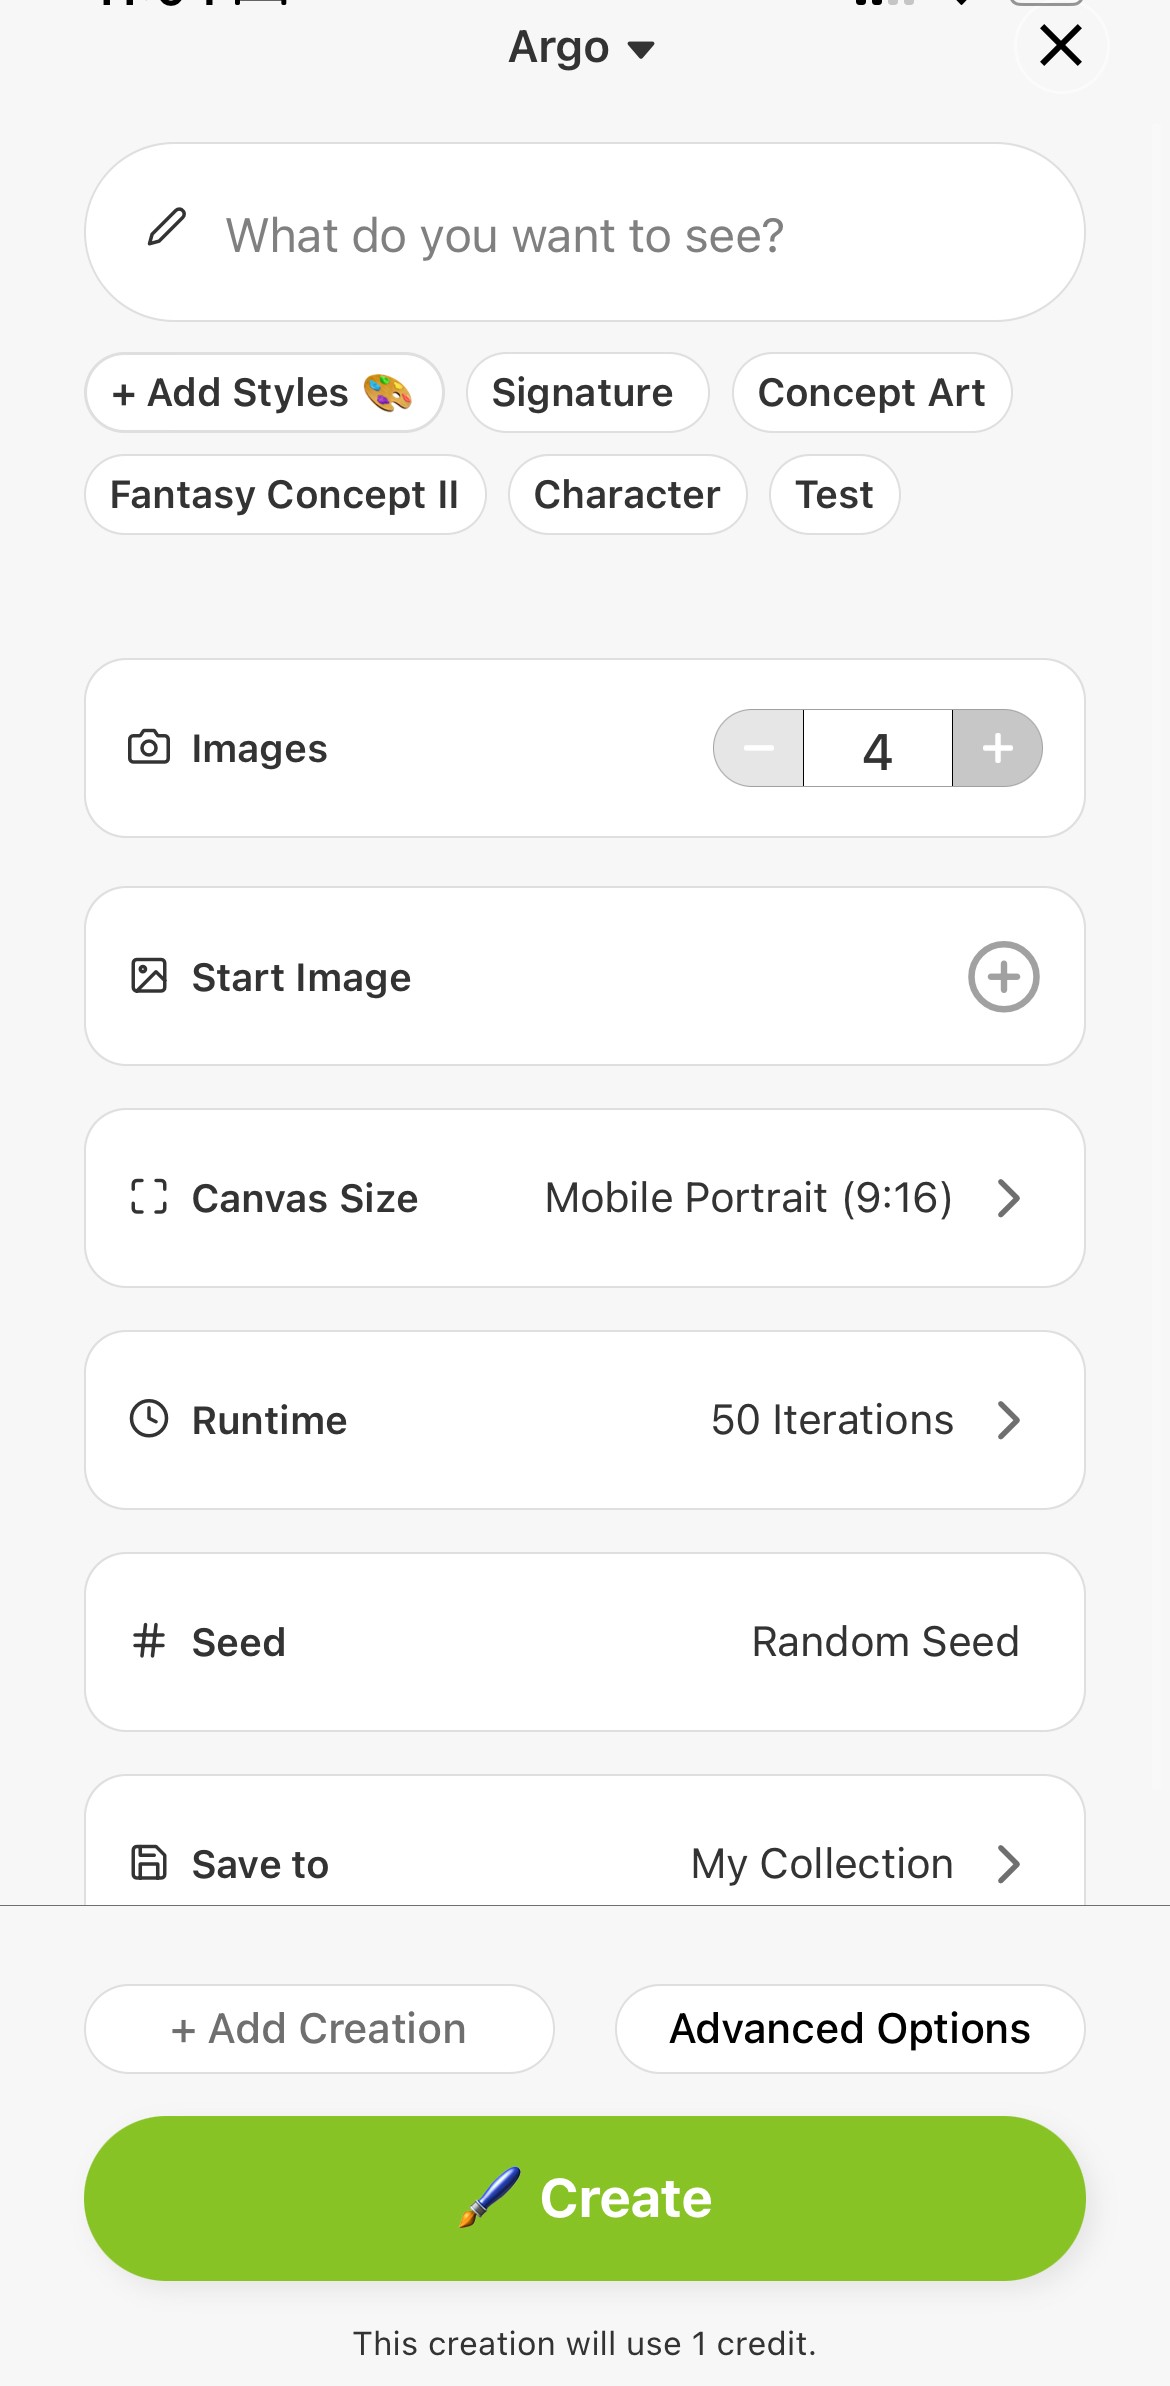
The first step is to consider the AI art prompt. When entering the prompt, think of how you’d describe the image to the AI. This can be as abstract or as literal as you wish. Argo does really well with descriptive details so we suggest to go all out when describing your creation. Alternatively, if you’re feeling lucky you can use the auto-prompt generator (mobile only) to enter a random prompt to work with.
Regardless, we suggest experimenting with your prompts as much as you can to render artworks that match your intentions. After all, art is an act of discovery more than it is of creation.
Once you’re done drafting your perfect, descriptive prompt, it’s now time to consider and select the Styles.
There are a variety of Styles you can choose from. We have categorized styles based on the types of creations they are best for. This allows you to quickly and swiftly create amazing art.
You’re allowed to mix and match up to ten styles so go crazy!
If you are intending to experiment (something we highly recommend), we suggest considering each style carefully and deduce, either via research or personal knowledge, if the intended style has historically produced the theme of the prompt as that helps ensure the success of the ai art created and that it matches your expectations.
Hack: Pssst! When you do crack the code and find your perfect recipe, you can save the Presets for easy workflow. Once you’re done adding your signature mix of Styles, you can tap on Save Preset at the top left corner of the app window. If you want to manage your Presets, tap the Manage Presets button on the top right corner. You can edit and/or delete your Presets from there.
You’re also able to use a Start Image to base your creations on. These images can be stock photographs & designs, your own traditional artwork or photography pieces.
Hack: Some of the most beautiful creations have come from pretty unconventional techniques. One of such techniques is marrying the different AI engines. Next time, try rendering an artwork in Orion and using Argo and adding the creation as a Start Image. See where that takes you and share your experiments with us on the starryai way *winks*
Non-Pro users are only allowed to work with the Portrait mode.
As a Pro-member you have access to all the canvas sizes offered on the app. We suggest to consider canvas size with the end-goal in mind. For instance, is it mean to be a desktop wallpaper? If so, then you may want to consider the Wide or Landscape orientations. If you’re considering to share them on Instagram, then the Square or Portrait would be the best sizes to choose from.
The runtime is a scale that communicates with Argo how much time it needs to spend to generate the artwork. You may have already guessed it- The longer the runtime, the more time Argo has to finesse the creation, allowing it to perfect it and make it as detailed as it can be. However, the higher the runtime, the longer it will take for the artwork to render and it costs more credits.


Each time you render an artwork, there is a random seed that comes attached with it, allowing the artwork to be unique every time.
However, if you’re looking to have more control over your iterations, setting the Seed manually is the best way to do so. Using the same seed can allow you to:


To do so, simply tap on the Seed number of your desired creation and highlight it to copy it.
Start a new image and this time tap “Random Seed” to be able to paste in the previous Seed number.
And voila! You can now fine tune, resize and add-on to the desired artwork!
Earlier in this guide we discussed Workspace and My Collections. Another way to organize your artwork in the intended spaces is to select it directly when creating the artwork. Simply tab on the Save To button. This will open up the menu showcasing different Projects (ones you have already created), as well as, My Collections. Tap on the desired destination and starryai will add your creations there.
Once your ai art is rendered, you have a range of options to expand on your work:
If you’re looking for more Advanced practices & guides to guide you more elaborately through our ai art generator app, starryai, we suggest to explore our Recipe blog. You’re also invited to join us on Discord where we regularly come together to showcase our artwork, share our tips, tricks, prompts & settings and basically just have a rad time together!


.png)
.png)